Turbo Native - How to Access Native iOS features with the JavaScript bridge
 Photo by Tyler Lastovich on Unsplash
Turbo Native - How to Access Native iOS features with the JavaScript bridge
Turbo Native is described by Basecamp as allowing you to build “high-fidelity” cross-platform apps. What exactly does this mean? To me, it’s the ability to build cross-platform apps that allow you to access the native functionality without the caveat of building the same functionality across the many different platforms. In this article, we’ll cover how we can access native functionality by writing just a tiny bit of Swift but mostly, just sticking to Rails.
In my last article, I covered navigating to a native screen via tabs. You can also navigate to native screens via the Path Configuration. In this article, we’re going to touch on the JavaScript bridge by building two features. One that sends an event to the iOS app via JavaScript and another that sends an event to the browser via the iOS app.
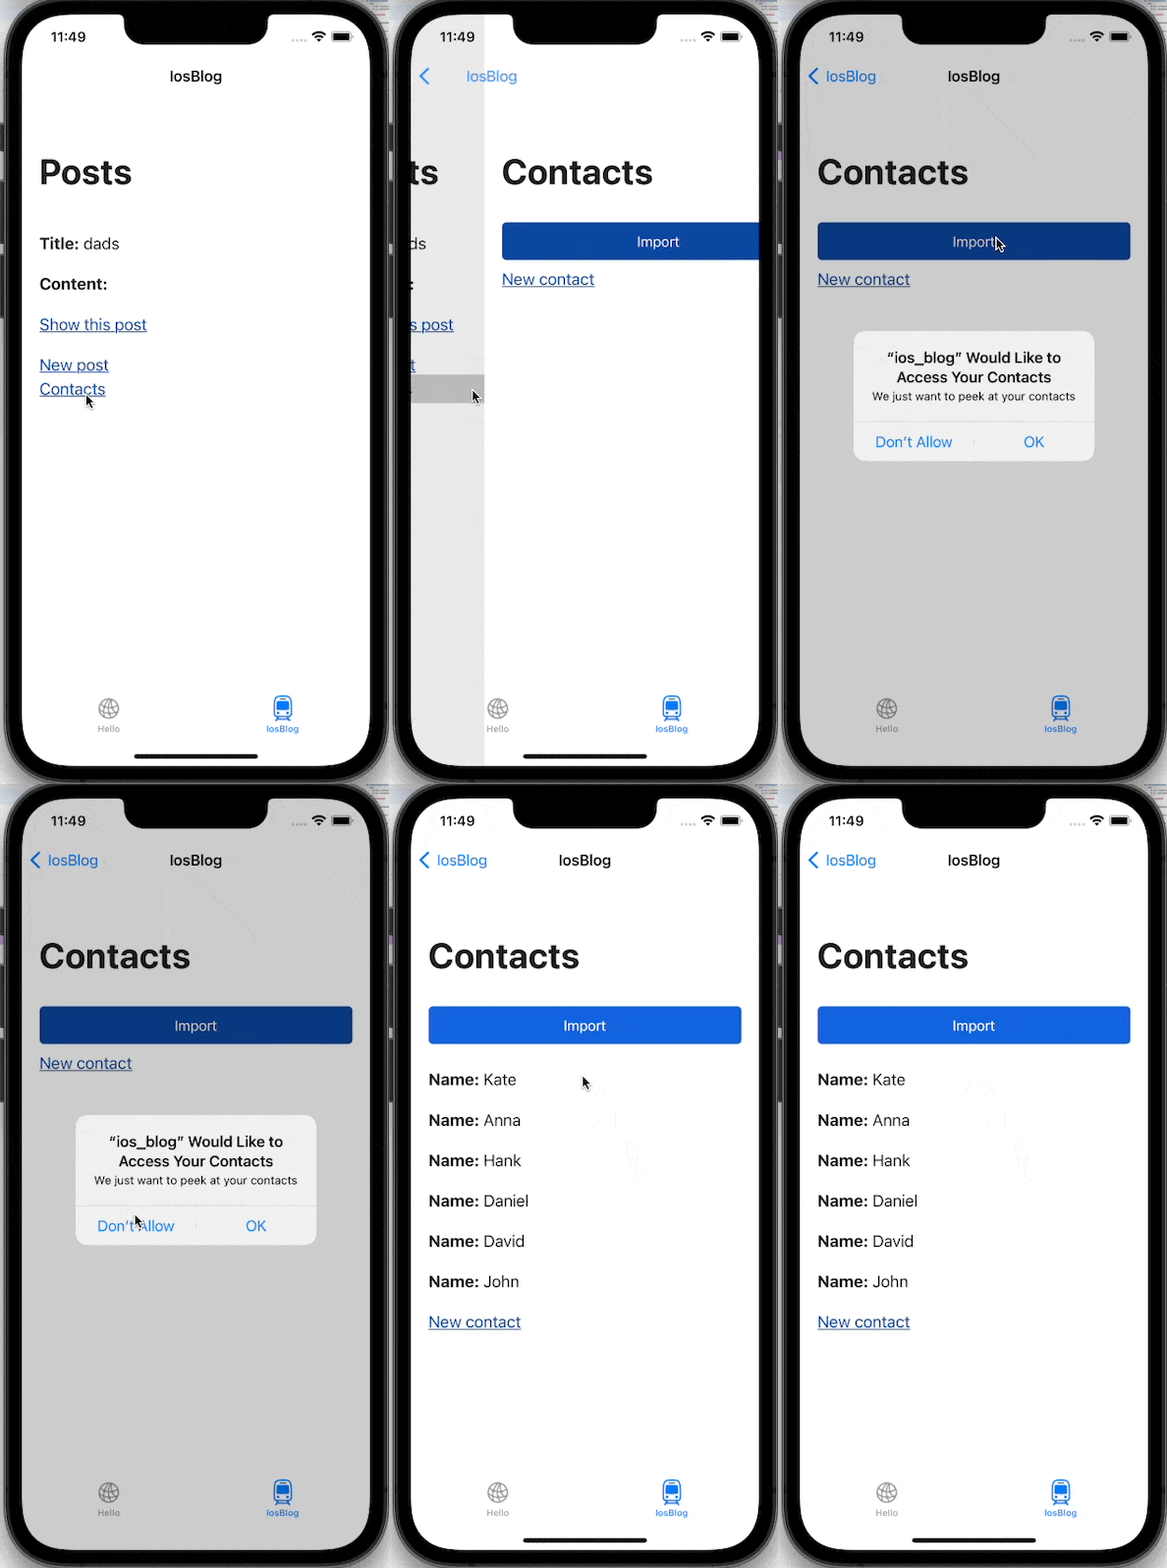
For this, we’re going to access the phone’s contacts. This was a feature I was asked about recently. Here’s what it looks like.

For this, you’re going to have to build off my last post.
This post is aimed at being step-by-step so you can get an idea of the link between Turbo Native and your Rails app. If you get stuck following along, feel free to email me and let me know.
The code can be found here and here.
1. Set up the JavaScript bridge
Sending messages to the iOS app is our first port of call. We do this by implementing a JavaScript bridge. In the Rails app that we created in the previous post, add the following to our app/javascript/application.js.
class Bridge {

  // Sends a message to the native app, if active.
  static postMessage(name, data = {}) {
    // iOS
    window.webkit?.messageHandlers?.nativeApp?.postMessage({name, ...data})
  }
}

// Expose this on the window object so TurboNative can interact with it
window.Bridge = Bridge
export default Bridge
Next, we’ll create a simple stimulus controller for a proof of concept. We just want to see if we can send a message to our iOS app and react to it. In app/javascript/controllers/hello_controller.js, change the following:
import { Controller } from "@hotwired/stimulus"

export default class extends Controller {
  connect() {
    window.Bridge.postMessage("hello")
  }
}
Now connect the controller to the DOM. In app/views/posts/index.html.erb
<div data-controller='hello' id="posts">
  <% @posts.each do |post| %>
    <%= render post %>
    <p><%= link_to "Show this post", post %></p>
  <% end %>
</div>
Now for the final step, we need to open up our iOS codebase and add a handler for our scripts.
In our iOS codebase, add a new folder called Models and then add a new file called ScriptMessageHandler.swift
import WebKit

class ScriptMessageHandler: NSObject, WKScriptMessageHandler {
  func userContentController(
      _ userContentController: WKUserContentController,
      didReceive message: WKScriptMessage
      ) {
    print("JavaScript message received", message.body)
  }
}
Now, we just have to adjust our Turbo Coordinator to allow us to react to JavaScript messages. In TurboCoordinator.swift, add the following:
...
import SafariServices
import WebKit

class TurboCoordinator: Coordinator {
  ...
  private func makeSession() -> Session {
    let configuration = WKWebViewConfiguration()
    let scriptMessageHandler = ScriptMessageHandler()
    configuration.userContentController.add(scriptMessageHandler, name: "nativeApp")
    let session = Session(webViewConfiguration: configuration)
    session.delegate = self
    session.pathConfiguration = PathConfiguration(sources: [
        .file(Bundle.main.url(forResource: "PathConfiguration", withExtension: "json")!),
    ])
    return session
  }
  ...
}
Now build and run the app and take a look at our output in Xcode.
You should see something like the following:
JavaScript message received {
  name = "Hello from Rails";
}
You will notice that you’ll actually receive it when the app loads up the first time. This is because the tab connects to the DOM straight away.
If we open the tab with the Rails app, you will see navigating between posts will log in XCode.
Even though we only got to Hello World, we have laid the foundation to go a bit further and extend on what we are doing.
React to JavaScript Messages
Now we have set the stage to react to JavaScript messages. Let’s do something bit more interesting than “Hello World”. Let’s go back to our original goal of retrieving the contacts from the iPhone.
First, we need to expand on our ScriptMessageHandler to make it a bit smarter.
import WebKit

class ScriptMessageHandler: NSObject, WKScriptMessageHandler {
  func userContentController(_ userContentController: WKUserContentController, didReceive message: WKScriptMessage ) {
      guard
        let body = message.body as? [String: Any],
        let msg = body["name"] as? String
          else {
            print("No call")
              return
          }
          handleMessage(ScriptMessageHandler.MessageTypes(rawValue: msg) ?? ScriptMessageHandler.MessageTypes.none)
    }

      private func handleMessage(_ messageType: MessageTypes) -> String? {
        switch messageType {
          case .hello:
            print("hello world")
              return nil
          case .contacts:
              print("contacts")
                return nil
          case .none:
                print("No message")
                  return nil
        }
      }

      enum MessageTypes: String {
        case hello = "hello"
        case contacts = "contacts"
        case none = "none"
      }
    }
Now rerun and build the app again. You should still see Hello World in the terminal but this time, we added a enum that allows us to start expanding our functionality.
Let’s see can we print off the contacts from the local Address book.
To keep things simple for the tutorial, we’ll keep everything in the ScriptMessageHandler.
First off, we import the contacts library.
import Contacts
Then, we add a method that will simply print off the contacts.
func fetchContacts() {
  let store = CNContactStore()
    var contacts = [CNContact]()
    let keys = [CNContactFormatter.descriptorForRequiredKeys(for: .fullName)]
    let request = CNContactFetchRequest(keysToFetch: keys)

    do {
      try store.enumerateContacts(with: request) { (contact, stop) in
        contacts.append(contact)
      }
    } catch {
      print(error.localizedDescription)
    }
  for contact in contacts {
    print(contact.givenName, contact.familyName)
  }
}
Finally, we update our handleMessage function:
private func handleMessage(_ messageType: MessageTypes) -> String? {
  switch messageType {
    case .hello:
      print("hello world")
        return nil
    case .contacts:
        fetchContacts()
          return nil
    case .none:
          print("No message")
            return nil
  }
}
Now in our Rails app, we do the following in app/javascript/controllers/hello_controller.js
import { Controller } from "@hotwired/stimulus"

export default class extends Controller {
  connect() {
    window.Bridge.postMessage("contacts", {name: "hello"})
  }
}
Now rebuild our iOS app and see it crash.
The reason for the crash is because we need to get add permission to our native app for contacts information. In our Info.plist, we have to add NSContactsUsageDescription.
Once that is added, then rebuild the app.
You will only have to grant permission once. When permission is granted, you should see the output printed in Xcode.
Kate Bell
Daniel Higgins
John Appleseed
Anna Haro
Hank Zakroff
David Taylor
So for, so good. Now let’s send that information to our Rails app.
Send Information to the Rails app
So we’re printing to the Xcode console but now let’s send it back to the Rails app. For this, we’re going to print the names with JavaScript via console.log.
Here we’re going to introduce a concept that Ruby programmers might not be familiar with and that is delegates.
Delegates in swift are classes that do work for other classes. They have 3 parts.
A protocol with the methods, a class(or delegatee class) and the class that is delegating.
It took me some time to get them so if this is a new concept, then feel free to reach out.
In our ScriptMessageHandler, we start by adding a protocol.
protocol ScriptMessageDelegate: AnyObject {
  func evaluate(_ name: String)
}
Then in the ScriptMessageHandler itself, we do the following:
class ScriptMessageHandler: NSObject, WKScriptMessageHandler {
  weak var delegate: ScriptMessageDelegate?
Finally, we move back to our TurboCoordinator and add an extension.
extension TurboCoordinator: ScriptMessageDelegate {
  func evaluate(_ name: String) {
    session.webView.evaluateJavaScript("console.log('\(name)')")
  }
}
Now we are ready to assign the scriptMessageHandler delegate to the TurboCoordinator.
We do this in the TurboCoordinator’s makeSession() method.
private func makeSession() -> Session {
  let configuration = WKWebViewConfiguration()
  let scriptMessageHandler = ScriptMessageHandler()
  scriptMessageHandler.delegate = self
  ...
}
Now, you can rebuild the app and navigate to the tab. Navigating back and forth, you’ll see logs in both Xcode and if you open Safari > Develop > Simulator, you’ll see JavaScript being printed to the console.
Now that we’ve covered the two way communication without having to integrate an API, let’s finish off our project.
Generate a Contacts Scaffold
Let’s generate a Rails scaffold called contacts.
rails g scaffold Contacts name:string
Now migrate your database:
rails db:migrate
Now, we just need to make it easy to navigate to our contacts page. In our posts/index.html.erb, change it to the following:
<%= link_to "New post", new_post_path %>
<%= link_to "Contacts", contacts_path %>
Let’s add a stimulus controller for triggering the importing of contacts from iOS then add it to our contacts/index.html.erb
Let’s create a file called app/javascript/controllers/contacts_controller.js
import { Controller } from "@hotwired/stimulus"

export default class extends Controller {
  import() {
    window.Bridge.postMessage("contacts", {name: "contacts"})
  }
}
Next, we add it to our app/views/contacts/index.html.erb
<p style="color: green"><%= notice %></p>

<h1>Contacts</h1>

<button data-controller='contacts' data-action='contacts#import'>Import</button>

<%= turbo_stream_from :contacts %>
Next, we broadcast over a turbo stream when a new contact is created, in app/models/contacts.rb
class Contact < ApplicationRecord
  after_create_commit { broadcast_append_to :contacts, target: :contacts }
end
Now there is only two more changes left:
In app/javascript/application.js, add the following method:
// Configure your import map in config/importmap.rb. Read more: https://github.com/rails/importmap-rails
import "@hotwired/turbo-rails"
import "controllers"
import "trix"
import "@rails/actiontext"

class Bridge {

  // Sends a message to the native app, if active.
  static postMessage(name, data = {}) {
    // iOS
    window.webkit?.messageHandlers?.nativeApp?.postMessage({name, ...data})
  }

  static importingContacts(name) {
    const csrfToken = document.getElementsByName("csrf-token")[0].content;
    fetch('/contacts.json', {
          method: 'POST',
          headers: {
          "X-CSRF-Token": csrfToken,
          'Content-Type': 'application/json',
          "Accept": "application/json",
          },
          body: JSON.stringify({contact: { name } })
          }).then((response) => response.json())
          .then((data) => {
              console.log("Success:", data);
              })
          .catch((error) => {
              console.error("Error:", error);
      });
  }
}

// Expose this on the window object so TurboNative can interact with it
window.Bridge = Bridge
Then back in our Swift codebase, change the following in TurboCoordinator,
extension TurboCoordinator: ScriptMessageDelegate {
  func evaluate(_ name: String) {
    session.webView.evaluateJavaScript("Bridge.importingContacts('\(name)')")
  }
}
Now, rebuild the app for the final time. Navigate to contacts and press the Import button.
You should see the names instantly appear thanks to Turbo Streams.
This feels like magic and opens up a whole world of possibilities for web developers. In the famous words of DHH, “look at all the stuff I’m not doing.”
We’re not building a new native screen. We are just building one screen. We are not creating a new API endpoint, we’re simply using the endpoint provided by the scaffold. In a time where business efficiency will become more and more important, small teams that go down this road will be able to pack a big punch.
This is just the tip of the iceberg as well. My latest project interacts with MapKit. You can interact with the Haptic engine, the Audio Player and more.
I just want to give a massive shout out to Joe Masilotti who provided technical and editing feedback on this article. His Turbo Native posts are the best in the business. I also recommend checking out the Jumpstart iOS Pro template by Joe alongside Chris Oliver of GoRails fame if you are looking to jumpstart your Turbo iOS app.
Happy Hacking.