Up and Running with Hotwire Native iOS 3 - Bridge Components
In the last post, we explained how you can navigate to a native screen by editing the path configuration and the handle function. This is a major bonus because native screens can improve the UX of the app.
However, there is a trade-off. Duplicating your screen multiple times across platforms comes at a price. That price is complexity and cost.
Pure HTML screens can lack that polish that a native screen has. Your users might feel that something is off. However, a skilled developer can make it work(and that’s you).
Yet what if there is a halfway point, a kind of bridge if you will, that could add native interaction to your HTML views.
In this post, we’ll explain how Bridge components work using an example from the demo app.
Bridge Components
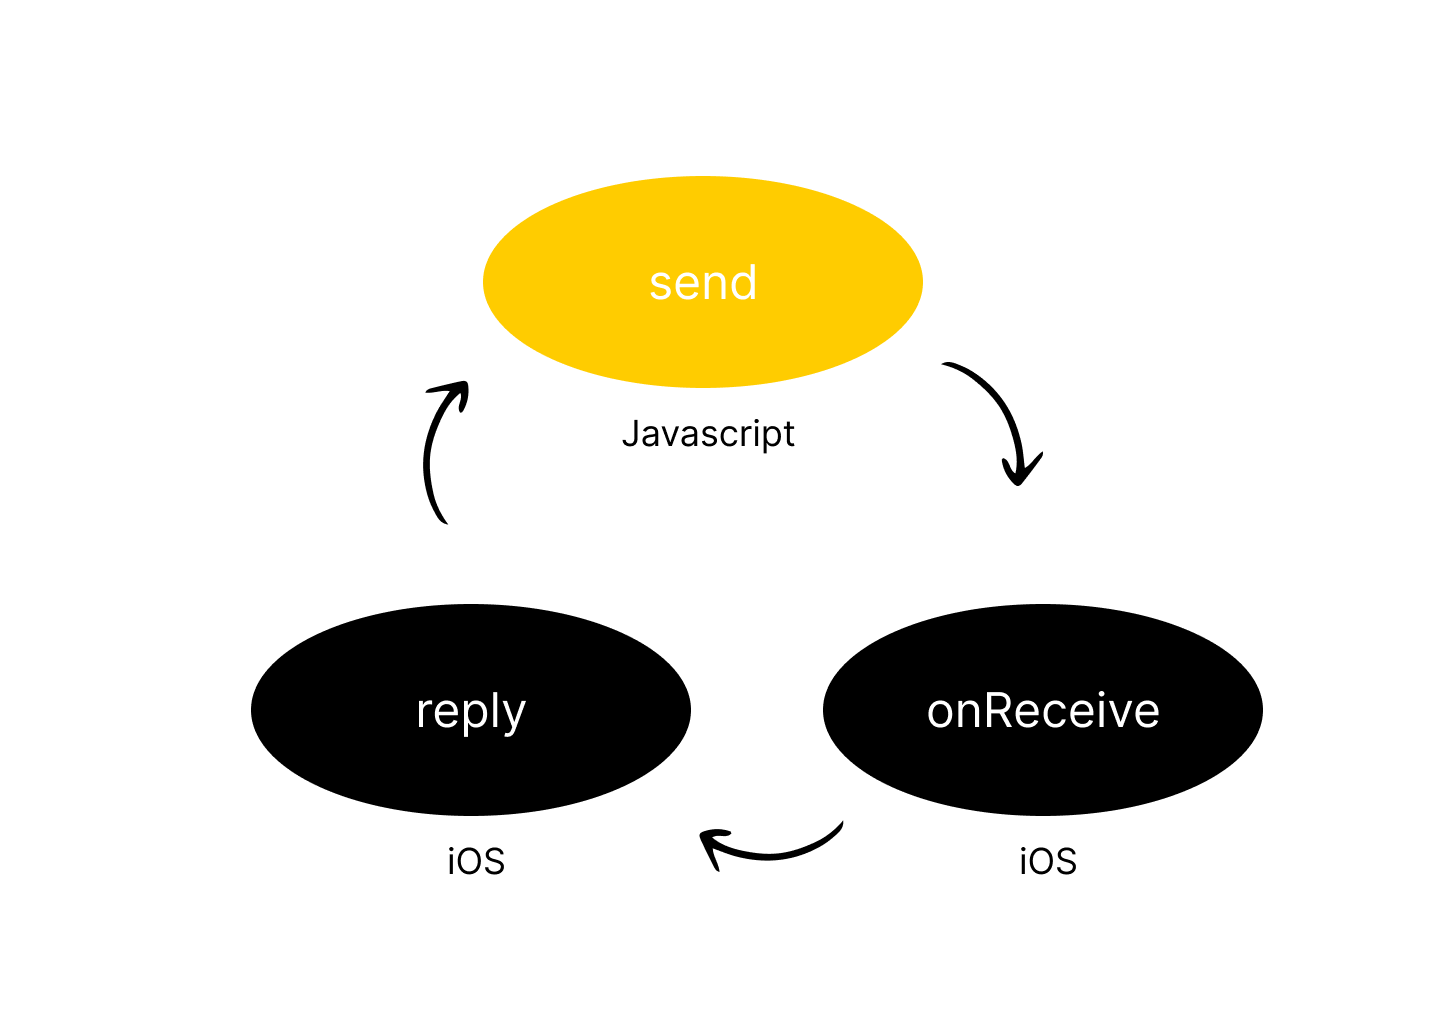
A Bridge component is an extension of a Stimulus controller that allows you to send messages to the native app.
To implement a bridge component, you do the following:
- Create a javascript component that can send and receive messages to your native app
- Create a native bridge component that can receive and reply to messages from your web app
- Add your native component to the Hotwire component register in our iOS app.
The important part of the Bridge method is the send method. This methodtakes an event, some data and a callback which gets executed when the native component replies to the message.
Let’s build the form component that adds a submit button to our modal for our forms.
The first thing we do is start with Rails app.
Ensure you have the Bridge library installed.
./bin/importmap pin @hotwired/stimulus @hotwired/hotwire-native-bridge
Then we can create a form bridge component under javascript/controllers/bridge/form_controller.js
import { BridgeComponent, BridgeElement } from "@hotwired/hotwire-native-bridge"

export default class extends BridgeComponent {
  static component = "form"
  static targets = [ "submit" ]

  submitTargetConnected(target) {
    const submitButton = new BridgeElement(target)
    const submitTitle = submitButton.title

    this.send("connect", { submitTitle }, () => {
      target.click()
    })
  }
}
Finally, in our form under todos/_form.html.erb, we add our stimulus markup.
<%= form_with(model: todo, data: {controller: 'bridge--form'}) do |form| %>
  <% if todo.errors.any? %>
    <div style="color: red">
      <h2><%= pluralize(todo.errors.count, "error") %> prohibited this todo from being saved:</h2>

      <ul>
        <% todo.errors.each do |error| %>
          <li><%= error.full_message %></li>
        <% end %>
      </ul>
    </div>
  <% end %>

  <div>
    <%= form.label :title, style: "display: block" %>
    <%= form.text_field :title %>
  </div>

  <div>
    <%= form.label :complete, style: "display: block" %>
    <%= form.checkbox :complete %>
  </div>

  <div>
    <%= form.submit data: {bridge__form_target: "submit", bridge_title: 'Save'} %>
  </div>
<% end %>
This is everything on our Rails side.
Now let’s get back to our iOS app.
Each native Bridge component involves the follows:
- We receive a message from the iOS app. This is done via the onReceive function.
- We reply with a message to the web app using the reply function
Let’s first build our form component talk through the code. Let’s add a new file called Bridge/FormComponent.swift
import Foundation
import HotwireNative
import UIKit

final class FormComponent: BridgeComponent {
    override class var name: String { "form" }

    override func onReceive(message: Message) {
        guard let event = Event(rawValue: message.event) else {
            return
        }

        switch event {
        case .connect:
            handleConnectEvent(message: message)
        }
    }

    private var viewController: UIViewController? {
        delegate.destination as? UIViewController
    }

    private func handleConnectEvent(message: Message) {
        guard let data: MessageData = message.data() else { return }
        configureBarButton(with: data.submitTitle)
    }

    private func configureBarButton(with title: String) {
        guard let viewController else { return }

        let action = UIAction { [unowned self] _ in
            reply(to: Event.connect.rawValue)
        }

        let item = UIBarButtonItem(title: title, primaryAction: action)
        viewController.navigationItem.rightBarButtonItem = item
    }
}


private extension FormComponent {
    enum Event: String {
        case connect
    }
}


private extension FormComponent {
    struct MessageData: Decodable {
        let submitTitle: String
    }
}
This is from the demo app but with a few lines removed so it’s easier for a new person to follow.
Finally, we register the components. In our AppDelegate, add the following to our function
@main
class AppDelegate: UIResponder, UIApplicationDelegate {
    func application(_ application: UIApplication, didFinishLaunchingWithOptions launchOptions: [UIApplication.LaunchOptionsKey: Any]?) -> Bool {

      ...
        Hotwire.registerBridgeComponents([
            FormComponent.self
        ])

        Hotwire.loadPathConfiguration(from: [
            .file(localPathConfigURL),
            .server(remotePathConfigURL)
        ])
        Hotwire.config.debugLoggingEnabled = true
        return true
    }}
Note: We have to register the Hotwire Components before we set our the rootViewController
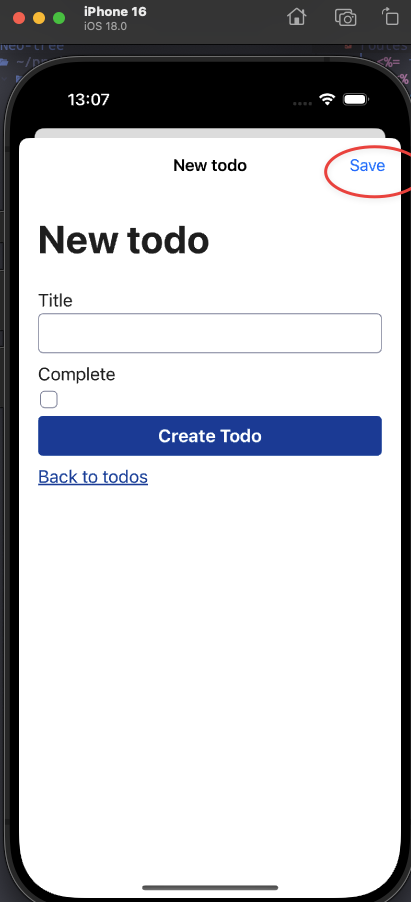
When you run the app and navigate to a new or edit, you’ll now see that we have a native button on the modal.

Understanding the FormComponent
Let’s chat through some of the code in the FormComponent.
Remember that our javascript implemented a send message.
In our onReceive function, based on the name of the event, we reacted accordingly.
When the event is called “connect”, we invoke the handleConnectEvent(message: message) with the message that we sent from our Bridge component.
We then build a UIBarButttonItem with an an action that calls the important reply function.
Finally, we add the bar button to the navigationItem so it sits on the right side.
When building your own form components, the important thing to remember is that you start with the onReceive function and then build from there, incorporating the reply function when needed.

Tidy up with CSS
Now we have two buttons that do the same thing. We have the HTML button and the native button. Let’s use some CSS to hide the HTML button if we are navigating from the Hotwire Native app.
In the app/views/layouts/application.html.erb, add the following:
<%= stylesheet_link_tag "native", "data-turbo-track": "reload" if turbo_native_app? %>
Now create a new stylesheet called native under app/assets/stylesheets
.hidden-on-native {
  display: none;
}
Now we can apply this class to whatever element we want hidden.
In app/views/todos/_form.html.erb, add the new css class to our button.
<%= form.submit data: {bridge__form_target: "submit", bridge_title: 'Save'}, class: 'hidden-on-native' %>
Closing thoughts
We have covered a lot. Bridge Components, although very powerful, can be quite difficult to master because they require knowledge of both iOS and javascript. However, practice makes perfect.
In the next post, we’re going tie lots of different native and web concepts together to really demonstrate the power of Hotwire Native.